This article describes the four step process for creating the main components of your new event.
After the event has been created you will be provided with the Event Link (URL) that may be used in your social media, emails, website, etc.
Additional Features may optionally be added to your event, these are not covered in this article but further information is available in the Additional Event Features category.
To commence, click the Add New Event link on the Organiser Control Panel or on the Manage Events screen.
Guide to Completing Step 1 - Core Event Details
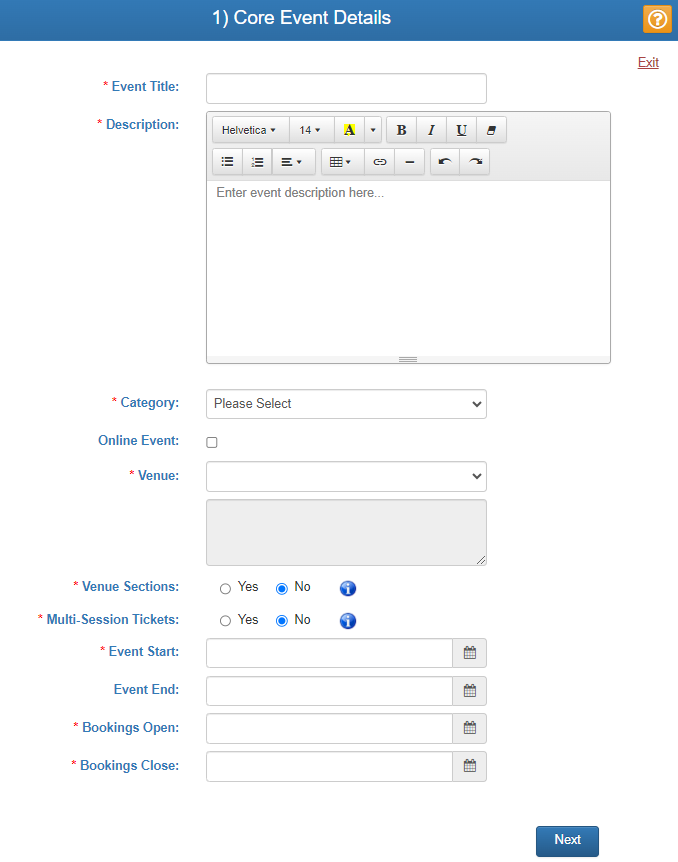
- Event Title: The name for your event (maximum 60 characters). Your Organisation Name is generally displayed separately as the event host, so there is no requirement to include it in the event title
-
Event Description: This is the long description of your event and should be used to provide your potential buyers with more detailed information about the event.
Basic Html formatting including font type, font size, font colour, text alignment, bullet points, indenting, tables and links can be applied by utilising the functions on the toolbar provided.
- Online Event: Select this option if your event is to be held online rather than at a physical venue. You will then be prompted to nominate a State for timezone purposes.
- Venue: A list of your previously created Venue records is available for selection. If your event venue is not present on the list, select Add New Venue and provide the required venue details in the popup screen.
-
Venue Sections: Venue sections are an optional feature that allow a venue to be split into separate areas. Sections are generally required if your event has any of the following features:
- Ticket prices vary for different areas of a venue eg. Stalls, Balcony, Premium, etc.
- Areas of the venue are reserved for a specific type of ticket buyer, eg. Students, Parents, Staff, etc.
- Areas of the venue have different characteristics eg. Allocated Seating versus General Admission.
- There are ticket categories that provide access to more than one session/event (Multi-Session Tickets)
If your venue has one or more of these requirements you should select Yes, otherwise select No
-
Multi-Session Tickets: Multi-Session tickets include any ticket category that gives the ticket holder access to more than one session/event. Some examples are:
- A 3 day music festival.
- A training course, that has a morning session and an afternoon session.
- A business conference with different events spread over 2 days.
If your event has one or more ticket categories that have multiple sessions you should select Yes, otherwise select No
- Event Start: The date/time that your event will start. Note: Click on the Date Picker icon to simplify entry of all date/time fields
- Event End: If your event has a specific end time, enter it here, otherwise leave this field blank
- Bookings Open: Date/time that ticket sales for your event will commence. This will default (to approximately the current time), but can be amended as required
- Bookings Close: Date/time that ticket sales for your event will close. This will default to 1 hour prior to the event start time, but can be amended as required
- Note: During the initial event creation, you may only add one performance/session date. If your event has multiple performances/sessions these may be added after the event has been created via the Add New Performance button on the Manage Events page.
Example

Click the Next button to proceed to Step 2.
Guide to Completing Step 2 - Venue Details
The design of this screen will vary depending on whether Venue Sections were enabled in Step 1.
A) Venue Sections Disabled
As Venue Sections are not activated, only a single row is required to define the settings for the Venue. This row will be automatically selected and the Section Name set to No Sections.

- Allocated Seats: If ticket-holders are to be allocated to specific seats, select Yes, otherwise select No for General Admission.
- Seating Plan: If your event is General Admission a seating plan is not required, so this setting will be disabled. If you selected Yes for Allocated Seating, you will need to create a Seating Plan for your venue. Initially, this requires just a name for the plan and the number of seats (capacity). A detailed seating layout chart should then be forwarded to TicketHost so that we can generate and upload the seating layout data in the required format. The chart should clearly identify the seating layout and a seat number for each seat. If you have previously used a Seating Plan for this venue, it can be selected from the list for re-use and does not need to be re-created.
- Capacity: If your event is General Admission, enter the maximum number of persons that can be admitted to your event. If your event has Allocated Seating, the Capacity must be entered at the time of creating the Seating Plan.
Example

B) Venue Sections Enabled
If Venue Sections are enabled, any previously used, active Sections for this venue will be displayed. You may opt to select one or more of the existing Sections or create new Sections.
Once the required Sections have been selected, use the same method as described above for completing the Allocated Seats, Seating Plan and Capacity for each selected Section.
Note: If Multi-Session tickets have been selected and Seats are not allocated, the Settings button will be displayed at the end of each selected row. This allows the Session Name and Session Date to be input.
Example

Click the Next button to proceed to Step 3.
Guide to Completing Step 3 - Ticket Categories
The design of this screen will vary depending on whether Venue Sections were enabled in Step 1.
A) Venue Sections Disabled
A list of previously created, active Ticket Categories will be displayed.

- To add an existing Ticket Category to your event, select the Ticket Category from the list and then click the Add Selection to Event button.
Note: You may select multiple Categories at one time by holding down the Ctrl key whilst clicking on the Categories.
- If the required Ticket Category does not already exist, click the Add New Ticket Category button to create it, before adding it to your event.
- Once a Category has been added to the event, the details associated with the Category can be view by clicking the '+' symbol next to the Ticket Description
- Ticket Description: This will default to the description of the selected ticket Category, but may be amended for this event if required.
- Price: Enter your ticket price for this Ticket Category. If the Ticket Category has the Charge GST flag set to Yes, then the price entered must be inclusive of GST.
-
Ticket Category Settings: Click the Settings icon to display additional options for Ticket Categories:
- Category Open/Close: If a Ticket category is not available for the entire bookings period (eg. Early Bird ticket), then the relevant date range should be entered in the Category Open and/or Category Close fields.
- Promo Code: If you wish to restrict access to a Ticket Category to specific Ticket Buyers, then a Promo code may be entered here and only distributed to the intended Ticket Buyers. Any Ticket Category with a Promo Code will not be visible until the Promo Code is entered. Note: Promo Codes are not case sensitive.
Example

B) Venue Sections Enabled
If Venue Sections are enabled, a list of previously created, active Ticket Categories AND a list of the included Sections will be displayed.
To add an existing Ticket Category to your event, select the Ticket Category from the list AND select the Section(s) that the Ticket Category will be available in. Then click the Add Selection to Event button.
Note: You may select multiple Categories and/or Sections at one time by holding down the Ctrl key whilst clicking on the selections.
Once the required Ticket Categories & Sections have been selected, use the same method as described above for completing the Ticket Description, Price and additional Settings.
Note: If a Ticket Category has Multiple Sessions, then a list of Sessions will be displayed on the Settings subscreen and the Sessions relevant to the Category must be selected.
Example

Click the Next button to proceed to Step 4.
Guide to Completing Step 4 - Configuration Options
The final step includes contact details and a range of event configuration options.

- Booking Notifications: Select Yes to receive an email notification every time a purchase is made for your event.
- Public Listing: Select Yes if you'd like your event to appear in TicketHost's event list and search results.
- Door Sales: If the Booking period on TicketHost is closed, the ticket buyer will be notified that tickets may be purchased at the door if this field is set to Yes
- Wait List: For sold-out events, if you wish to allow Ticket Buyers to add their name to a Wait List (in case tickets becoming available via cancellation), set this field to Yes.
- Reminder Email: If set to Yes, a reminder email will be sent prior to the event to all Ticket Buyers. You may select the prior interval from a list of times.
- Event Status: If Active is selected, ticket sales will be enabled from the Bookings Start Date. If Pending is selected, the event will be on hold and ticket sales will not be opened. (irrespective of the Bookings Start Date). Note: Event Administrators are able to make Bookings at all times, irrespective of this setting.
-
Host Fee Paid By: The Host Fee is levied on each ticket purchase and it represents the TicketHost charge for providing the ticketing service. You may elect to have this fee paid by:
- Ticket Buyer: Host Fee is added to the Ticket Buyer's order value
- Event Holder: Host fee is not added to the order value, but rather will be deducted from the ticket revenue paid to the event holder
-
Booking Fee Paid By: The Booking Fee is charged to recover the bank fees and other fees incurred in processing online payments. The Booking Fee varies by Payment Method. You may elect to have this fee paid by:
- Ticket Buyer: Booking Fee is added to the Ticket Buyer's order value
- Event Holder: Booking fee is not added to the order value, but rather will be deducted from the ticket revenue paid to the event holder
- Payment Options: There are currently 3 payment options available, Credit Card, EFT & PayPal. Credit Card is mandatory, but you choose whether or not to allow EFT or PayPal payments for your event.
Click the Finish button to create your event.